Installing a website and a REST API on a Raspberry-Pi using Docker
Installing a website and a REST API on a Raspberry-Pi using Docker#
We want to install a website and the Covid-19 REST API on a Raspberry Pi to access the Covid-19 data using a browser. For this we will use a Raspberry Pi model 3 and Docker. As Docker is also working on other Linux Distributions, MacOS and Windows, you may want to use it on this platforms first. In this case you can imediately jump to the Docker installation.
Preparing the Pi#
Install the Raspberry Pi OS (previously called Raspbian) Lite package on a Raspberry Pi. The Lite package does not include any GUI and it is the most simple Linux on the Pi having everything on board that we need. The image can be found here: Raspberry Pi Foundation Homepage.
Connect a keyboard, mouse and monitor to the Pi and if possible a wired network to boot it. Later on we won’t need a keyboard, mouse or monitor anymore, but during the setup it is essential. A good documentation about installing a Raspberry Pi can be found here: Raspberry Pi Foundation Documentation.
Power up the Pi and log in. The default user name is pi, with password raspberry. Remember the default keyboard layout is set to UK. After booting the Pi we can start the configuration utility to configure the Pi. Type sudo raspi-config to start it:
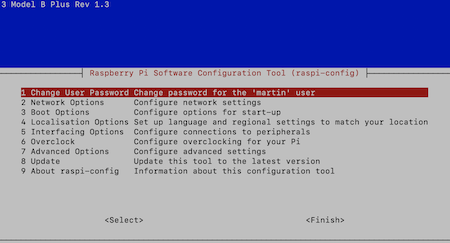
We want to configure these options in raspi-config:
- Expand the filesystem to make use of the full size of the SD card
- The language
- The keyboard scheme
- The timezone
- The WiFi (if you use it)
- The hostname of the Pi
- Enabling SSH
It’s pretty simple to setup the parameters above using raspi-config but we also need to configure some options using the command line:
- The network parameters
- Create a new user with admin rights
- Delete the default user
- Install and configure SAMBA to access a folder on the Pi via the network
Before we use the command line we will make the changes using raspi-config. After that we will exit the utility and update our Pi and reboot it to apply the changes that we have made so far:
sudo apt-get update
sudo apt-get upgrade
sudo reboot
Keep in mind that you may have changed the keyboard layout. Login again as the user pi, with password raspberry again.
To change the IP address load the file /etc/network/interfaces in the nano editor:
sudo nano /etc/network/interfaces
If you scroll down a bit in the file you will find an example for a static IP configuration. Apply your static IP, the router and the DNS server addresses:
...
# Example static IP configuration:
interface eth0
static ip_address=192.168.2.93/24
static routers=192.168.2.1
static domain_name_servers=192.168.2.1 8.8.8.8
...
Save the file using CTRL+O and exit nano with CTRL+X.
raspi-config will allow you to change the name of the host. If you use another ARM based box such as the Odroid XU4 you have to change the hostname manually. This can be done by editing /etc/hostname:
sudo nano /etc/hostname
Change the hostname here and save the file. To apply the change we need to reboot the system.
Now lets create a new user called newUser:
sudo adduser newUser
You’ll be prompted for the full name and a password for the new user newUser. Leave the passord blank if you don’t want a password, but we strongly recomment to use a strong password. Adding a user will also create a home directory for this new user and you will find it in /home/newUser.
The default pi user on Raspberry Pi OS is a member of the sudoer group. This gives the ability to run commands as root when preceded by sudo, and to switch to the root user with sudo su.
To add the new user to the sudoers group, use the adduser command again:
sudo adduser newUser sudo
But newUser still needs to enter his password if he uses a sudo command. If we want to avoid this we have to create a custom sudoer file and place it in /etc/sudoers.d
sudo visudo /etc/sudoers.d/010_newUser-nopasswd
This will create the file and opens nano. Place this line into the file and save it:
newUser ALL=(ALL) NOPASSWD: ALL
We can delete the default pi user and his home directory:
sudo userdel -r pi
Now it’s again a good time to reboot the Pi before we will add a Samba share. Login as newUser. After logging in we will be in the home directory of the newUser. Let’s create a sub-directory here that we will share:
mkdir ~/share
To make use of network filesharing we have to install Samba on the Pi:
sudo apt-get install samba samba-common-bin
Next we have to configure Samba by editing its configuration file:
sudo nano /etc/samba/smb.conf
In the beginning of the file you will find the workgroup name and the support flag for winsocket. Use a workgroup name (here WORKGROUP) that matches your other devices:
workgroup = WORKGROUP
wins support = yes
Scroll down to the end of the file to add a configuration for the folder that we want to share. Add these lines to the very end of smb.conf. CMBT-PI-Share is the name of our shared directoy as it will appear in the network and you may want to use your prefrred name:
[CMBT-PI-Share]
  comment=CMBT-PI share
  path=/home/newUser/share
  browseable=Yes
  writable=Yes
  only guest=no
  create mask=0777
  directory mask=0777
  public=no
SMB requires permissions for the user who wants to connect to it. rasp-config will do this for you but on other systems you have to add useres manually:
sudo smbpasswd -a newUser
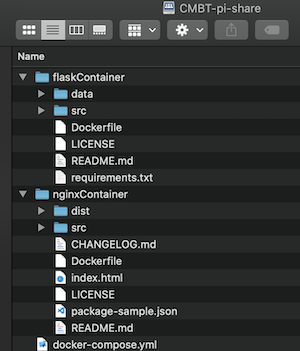
Type-in the password of newUser again and you are all set. After a reboot the network share will appear in the network on MacOS and Windows and you can mount it using the credentials of newUser:
We can remove monitor, keyboard and mouse as we now can use SSH to connect to the Pi. Notice: 192.168.2.93 was the static IP address that we configured. Use the one that you applied instead in the following command:
ssh newUser@192.168.2.93
To logoff we can simply use exit.
Creating a Docker account and installing Docker#
If you don´t have a Docker account yet you can create one here: https://www.docker.com. There you can also download Docker as a Community Edition for free for Windows or MacOS. For MacOS and Windows we can just execute the installers. On the Pi we can install Docker using the following commands after logging on to the Pi:
curl -fsSL https://get.docker.com -o get-docker.sh
sudo sh get-docker.sh
sudo usermod -aG docker newUser
The first command will download the Docker installation script, the second line will execute it and in the thrid line we add the user newUser to the user group docker so that newUser can start and stop Docker images. After that we need to sign off the Pi using exit and on again to apply the changes to the user.
What we want to do is to start a webserver on the IP address of the Pi (or Windows, or MacOS system) that we can easily edit. Beside that we want to expose our Convid-19 API in a subdirectory below the IP address. so that http://192.168.2.93 will point to the webserver and http://192.168.2.93/API to our REST API. Obviously that are two webservers and we need to route them. On the Docker Hub (https://hub.docker.com) we will find Traefik which is exactly doing this. As a webserver we will use Nginx and Flask as the REST API server. To put all the three images together we will use Docker Compose. Traefik is an out-of-the-box image and we need to build images for Nginx and Flask in which we define rules for the routing of Traefik.
As a preparation we will copy all files and subdirectories of the Covid-19-Pi directory to our shared directory /home/newUser/share on the Pi. You can do this via your network share. On windows and MacOS we can just use the directories as they are.
To build a Docker image you will need a so called DockerFile that includes commands for the build process. The default name for this file is Dockerfile without an extension. To build the image you use the docker build command. If you don’t want to use the default filename you can use the -foption for the command and specify the filename. In this example we will use the default filename.
Building the nginx image#
You will find the files required to build the image in a subdirectory named nginxImage. The Dockerfile for this image has only two lines:
FROM nginx:latest
COPY . /usr/share/nginx/html
The first line refers to an existing image of nginx on Docker Hub in its latest version that we use as a basis. The second line copys all the data of the directory of Dockerfile to the Linux inside the image and there in the /usr/share/nginx/html directory. That is were nginx expects the HTML site and it will start loading index.html. Feel free to modify all the files here and/or add additional files.
ATTENTION
Be aware of the file access rights. Nginx will report a 403 error (forbidden) if it can´t read a file. If you are in doubt about the file access rights on your system you can use chmod -R 777 ./nginxImageto set the rights recursively for all file in the nginxImage directory to read, write and execute.
Connect to the Pi using SSH (ssh newUser@192.168.2.93) again or open a terminal on Windows or MacOS. Change to the directoy of the nginx image and use the following command to build the Docker image for the nginx web server:
cd /home/newUser/share/nginxImage
docker build -t nginx_website:latest .
Notice the . at the end of the second command line. This process does not need too much time as it has not too many dependencies.
Building the FastAPI image#
You will find the files required to build the image in a subdirectory named Covid-19-analysis. The Dockerfile for this image has some more lines:
FROM python:3.7.7
COPY . /app
RUN pip3 install -r /app/requirements.txt
EXPOSE 5000
WORKDIR /app/src/rest
CMD ["uvicorn", "app:app", "--host", "0.0.0.0", "--port", "5000"]
The first line refers to an existing image on Docker Hub in its latest version that we use as a basis. It´s a Linux with a preinstalled Python 3.7.7. The second line copys all the data of the directory of Dockerfile to the Linux inside the image and there in the /app directory. We could use any directory name here but we need the directory name in the next line as well when we install the dendencies for our Python code. Then the requriements are installed. Last but not least the uvicorn app is started with the right parameters.
ATTENTION
Be aware of the file access rights. All files shoud have read, write and execute rights. If you are in doubt about the file access rights on your system you can use chmod -R 777 ./Covid-19-analysisto set the rights recursively for all file in the Covid-19-analysis directory to read, write and execute.
In the fourth line we expose port 5000 to the outside as we use this port in the REST API. In the final line we start our REST API by executing app.py. Use the followinfg command to build the image:
docker build -t covid_api:latest .
This will take several hours to complete as many dependencies such as Pandas, Numpy and Matplotlib need to be included.
Compose the images and start the container#
Now we can double check if the two images habe been built by using docker image ls that will list all installed images:
[~/Documents/GitHub/Covid-19-Pi/flaskImage]$ docker image ls
REPOSITORY                 TAG                 IMAGE ID            CREATED              SIZE
covid_api                  latest              f8264dda1db8        9 seconds ago        1.26GB
nginx_website              latest              c3bc94d7915d        About a minute ago   132MB
flask                      latest              e8ef8e164ae4        8 days ago           1.29GB
...
Next is to compose them. This is done by docker-compose. Again it needs a configuration file and uses a default filename called docker-compose.yml. This is the file and it is a bit more complex. Please keep in mind to change the IP address 192.168.2.93to the addrrss of your Pi, or to localhostin case you want to execute it under MacOS or Windows. :
version: "3.0"
services:
  traefik:
    image: traefik:v2.0
    command: --providers.docker
    ports:
    - "80:80"
    - "5000:5000"
    volumes:
    - /var/run/docker.sock:/var/run/docker.sock:rw
  website:
    image: nginx_website:latest
    labels:
    - traefik.http.routers.website.rule=Host(`mb.cmbt.de`) || Host(`192.168.2.93`)
  rest:
    image: covid_api:latest
    labels:
    - traefik.http.routers.rest.rule=Host(`mb.cmbt.de`) || (Host(`mb.cmbt.de`) && PathPrefix(`/api`)) || Host(`192.168.2.93`) || (Host(`192.168.2.93`) && PathPrefix(`/api`))
The first line defines the version of the compose file. The actual version is 3.7 but we can still use version 3.0. The containers will be listed in other services section that starts with services:. Our first image is traefik in version v2.0. It is started with the command --providers.docker that will listen on the socket provided by Docker. This socket is given to Traefik as a Docker volume in the volumessection giving read and write access. The ports are given to Traefik in the portssection and we will map port 80 to 80 and 5000 to 5000 (inside the container to outside the container).
The next services is our webserver using the image that we created above (image: nginx_website:latest). We name this as website. The routing rules are given to Traefik as labels and we define one rule here: All http traffic on port 80 will be routed to our webserver website when the requested host is either mb.cmbt.de or (||) 192.168.2.93.
The last service is our REST API, also using the image that we created above (image: covid_api:latest). We name this as restand create again a Traefik rule. All trafic requesting mb.cmbt.de/api or 192.168.2.93/api will be routed to our REST API rest.
Actually it took quite a long time to have defined proper routes but finally it works fine as expected. To compose the images and to start them use the following command using the default filename docker-compose.yml:
docker-compose up
To stop it you can use CTRL+C or
docker-compose down
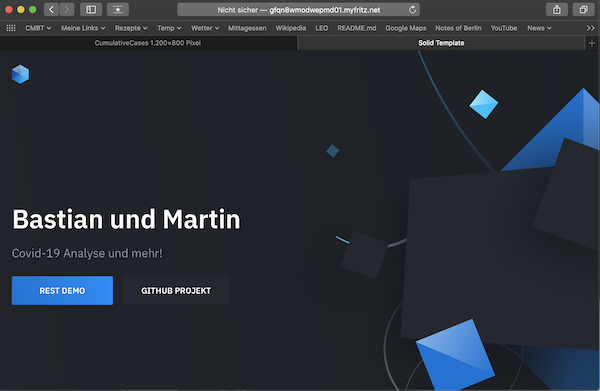
This is the result when we run it on localhost. First the website and then the output of the REST API:

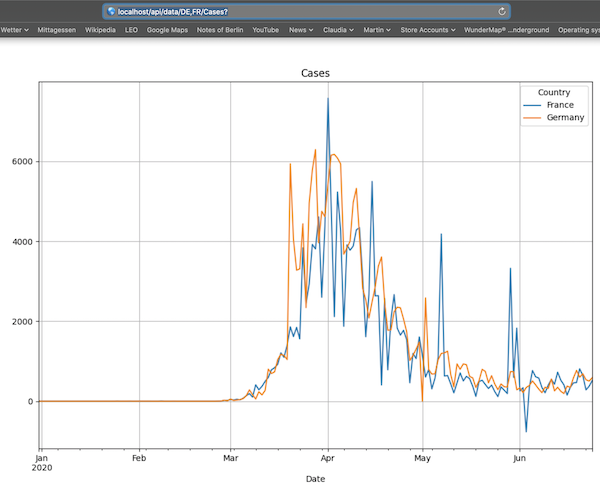
And the same for using the dyn DNS service of the Fritz!box:
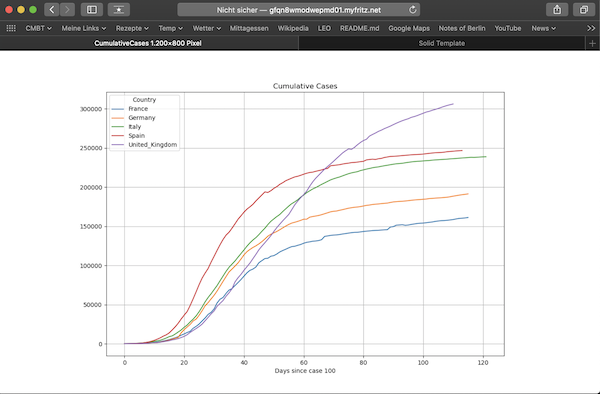
Notice the web address: http://mb.cmbt.de/api/data/DE,UK,FR,IT,ES/CumulativeCases?sinceN=100. This will return you a picture showing the cumulative cases for Germany, UK, France, Italy and Spain since the day when the 100th. case has been exceded. To learn more about the API functionality head to http://mb.cmbt.de/docs.
While docker is running you can open a second terminal and connect to the Pi using SSH. Type docker ps to see all running processes in Docker:

We see all three containers that we are using running at the same time taking care for the network traffic. docker images or docker image ls lists all images installed on the system.
docker container ls -all will list all containers installed on the system.
docker rm *ID* will remove a container by the givven ID.
docker stop *ID* will stop a running container by the given ID.